
When Lizzy asked me to be a part of her Summer Camp for 1001 Peeps… I was more than a little excited! See… when I went to Spring Market this year her presentation on her inspiration for this line was my super fav! In fact, after getting home I purchased Arabian Nights to read the stories she spoke about and reference in her line… lOVE them!


That’s when I knew I wanted to make a tutorial for a “Reader”. Our family reads many, many books through the year, but especially in the summer! Being that I have only boys, I did make a more masculine project, however… you could easily exchange some of the fabrics with other colorways from her yummy line! Hope you find it to be as smart and classic as Lizzy’s new line. If you need some... you can find it here.
*** Please note this Pattern is for the smaller version "black" Kindle reader. ***

Let’s get Crafty… shall we!!??? Hehehe….
Materials Needed:
Front fabric – (1) 6.5” X 9.5”
Backing fabric – (1) 6.5 X 9.5”
Pocket fabric – (1) 6.5” X 14”
Lining fabric – (2) 7” X 9.75”
Fusible Interfacing – (2) 6.5” X 9.5
1” Diamond Paper Pieced templates - (6)
Diamond fabric – (7” scrap piece)
Button
Rubber Band
Embroidery Thread


First, you'll take your templates and pin them to the wrong side of the fabric, allowing at least 1/4" of overage.

Basting Diamonds:
Taking the diamond, folding the fabric over the exposed template at the side point and insert your needle. (remember to knot your thread before beginning each template)

As you move around each Diamond's sides, you can either adjust your pin or simply remove it (which is what i do, but you obviously must be careful not to allow your template to slip out of position! LOL)

Continue with this process until you have basted each side and then simply tie the thread off.


Joining the Diamonds:
This process is very similar to sewing Hexagons together. (if you'd like a better example of this process, you can look it up here.) Remembering to backstitch at the beginning and at the ending of each side, simply place your diamonds Right side to Right side and sew them together using a ladder stitch.


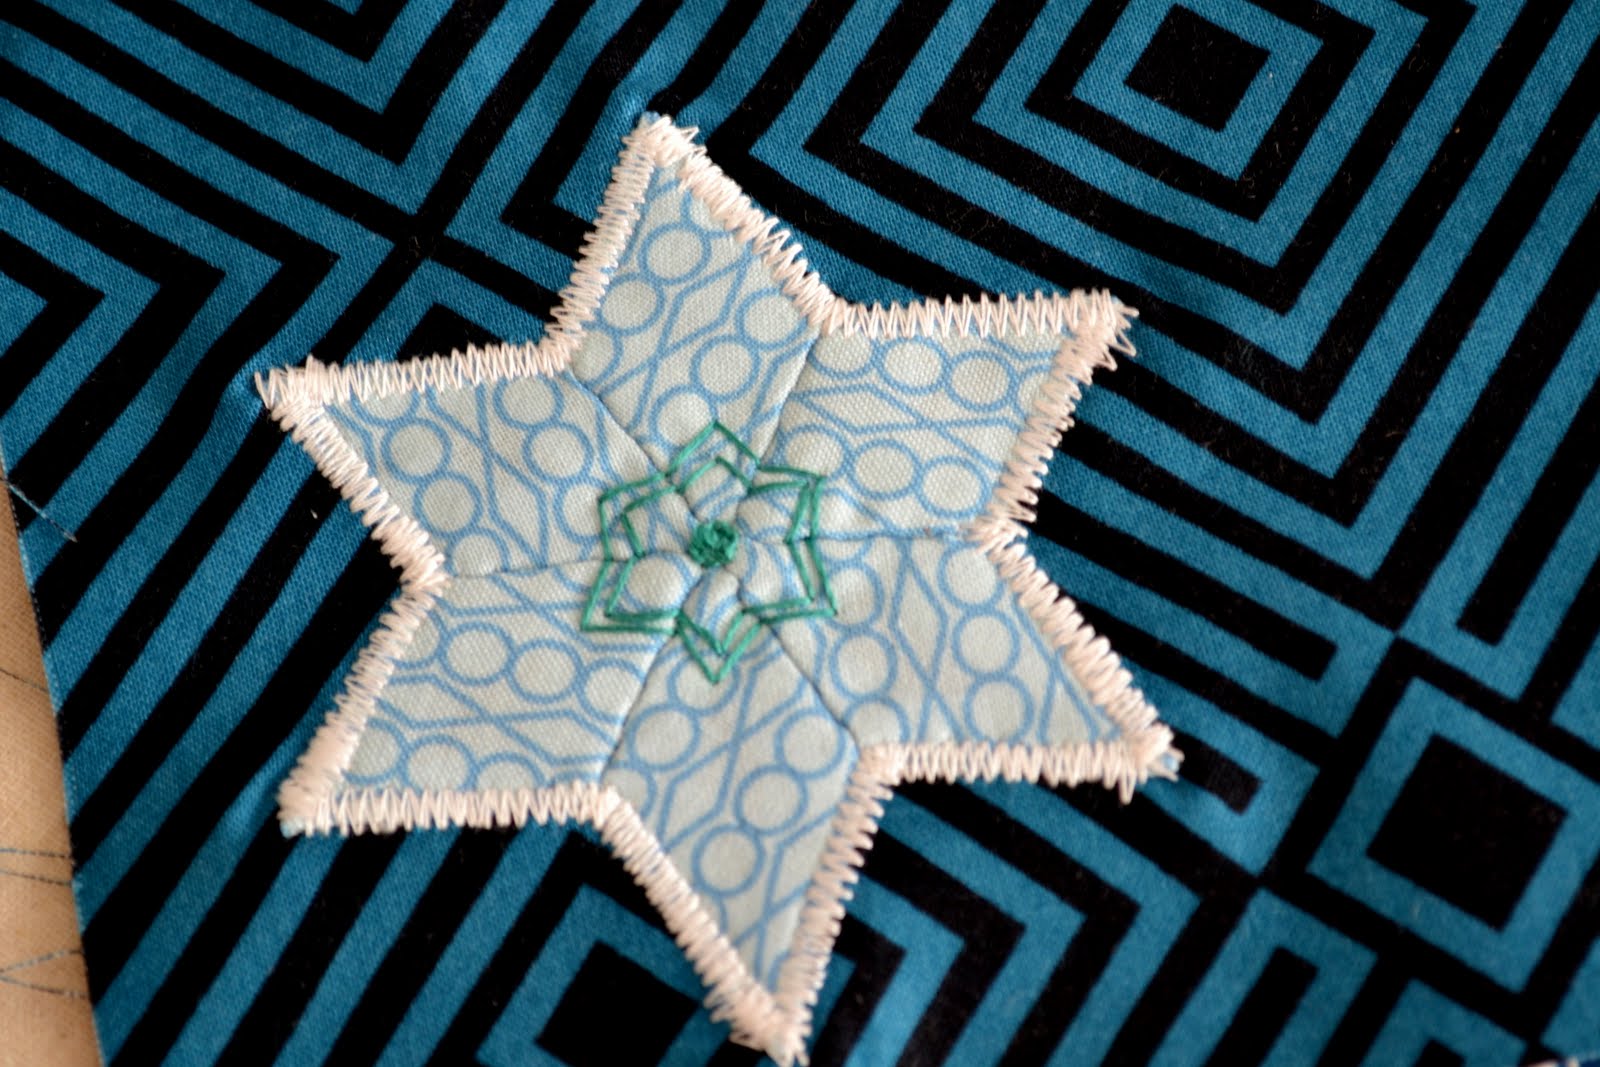
After sewing all 6 diamonds together, you'll end up with a fancy pants Star. ;)

Now grab your Pocket Fabric and fold it in half (lengthwise), press, and sew a 1/8" top stitch along the fold.

Up next, grab your Fusible Interfacing (I used a pretty thick one and it was a real pain to work with, but gives me my desired overall preferred look... stiff! hahaha... you could use a less thick product or even fleece, if you'd prefer.) and your Front & Backing fabric. Iron the Interfacing onto the wrong sides of each of those fabrics. ( remember to follow the suggested ironing interfacing directions that is provided with the product.)

I added some simple straight line quilting to these project pieces, to add some extra detailing while giving them some additional support.

Now grab your fancy pants Star, remove your basting threads (I use a seam ripper) and press all your unruly fabrics tabs & threads inward. Also, don't panic, they always look like a little "hot mess" on the backs after this process!! LOL

Pin your star to your Pocket Fabric.

Using a ZigZag Stitch, sew the Star on the Pocket. (I went around mine twice, just for the look! :P )

Ta'da!

At this point, grab your Embroidery Thread and a little detailing to your Star, if you'd like. (I used thread that coordinated with my lining fabric.
Pin your Pocket to your Front side fabric and give baste them together using 1/8" seam.


Time to take your Backing fabric and Front fabric, Right side to Right side, pin in place and sew 1/4" seam. (remember to backstitch!)

Snip your corners.

and Flip that beauty inside out!

Button time! Grab your button, place it in the middle of your Outside cover and mark it (Remember... You'll have a 1/4" seam from the top of the Outside Cover and to Leave the appropriate amount of space to support it between your button and the top.). Using your coordinating Embroidery Thread, sew your button on filling up your holes, so the Thread color pops!


We're cooking now! Grab your Lining fabric and pin them together Right side to Right side!

Sew 1/4" seam on both sides and across the bottom. Leave a good 3" opening to pull your Stiff outside pocket through and DON'T forget to backstitch this part!! (You will be man-handling this area later!! LOL)

Slide your Lining over the Outside cover, Right side to Right side.

Using your pre-sewn button as a guide, mark off with a pin where to place your Rubber Band.


Slip your Lining off your Outside cover. Using your sewing machine; line up your Rubber Band with the marking pin, pinching it in place with your fingers, and leaving an approximate 2/3rds of the Rubber Band facing the inside of the Lining, sew it in place.

You'll be using the Rubber Band frequently, so I suggest going over it many time to keep it secure.

Sliding your Lining fabric back over your Outside Cover, pin in place. Sew 1/4" seam around the perimeter.

Here's the Grand Finally time!... Now, pull your Outside Cover through the Lining hole!!

Simply sew your lining seam closed with an 1/8" seam and tuck inside the Outside Cover! Give it a little press (being careful not to touch your Rubber Band) and Presto! YOU're done!!

You'll have yourself one swanky, 1001 Peeps-A-Licious Kindle Cover for all your's or your loved one's favorite stories this summer!!


Here's to a smashingly fun rest of the summer!!
Xo, Heather
Ps... Have you met the other Fantastical Camp Counselors???
June 24: Alexia Abegg, Craftopia
July 1: Beth, Lemon Cadet
July 8: The Fat Quarterly!
July 15: Susan Allen, of the Quilt Asylum
July 22: Amanda, MrsMcPorkchop
July 29: Anne Weil, Flax and Twine
August 5: Heather, House of A La Mode ** Eeek! that's me! **
August 12: Karyn Valino, Make Something
August 19: Deborah Moebes, Whipstitch
No comments:
Post a Comment